Using MCP in Roo Code
An MCP (Model Context Protocol) server acts as a bridge, giving Roo Code access to a wider range of tools and external services like databases, APIs, or custom scripts. It uses a standard communication method, allowing Roo to leverage these external capabilities.
For a deeper dive, check out What is MCP?.
Model Context Protocol (MCP) extends Roo Code's capabilities by connecting to external tools and services. This guide covers everything you need to know about using MCP with Roo Code.
Configuring MCP Servers
MCP server configurations can be managed at two levels:
- Global Configuration: Stored in the
mcp_settings.jsonfile, accessible via VS Code settings (see below). These settings apply across all your workspaces unless overridden by a project-level configuration. - Project-level Configuration: Defined in a
.roo/mcp.jsonfile within your project's root directory. This allows you to set up project-specific servers and share configurations with your team by committing the file to version control. Roo Code automatically detects and loads this file if it exists.
Precedence: If a server name exists in both global and project configurations, the project-level configuration takes precedence.
Editing MCP Settings Files
You can edit both global and project-level MCP configuration files directly from the Roo Code MCP settings view:
- Click the icon in the top navigation of the Roo Code pane.
- Scroll to the bottom of the MCP settings view.
- Click the appropriate button:
Edit Global MCP: Opens the globalmcp_settings.jsonfile.Edit Project MCP: Opens the project-specific.roo/mcp.jsonfile. If this file doesn't exist, Roo Code will create it for you.

Both files use a JSON format with a mcpServers object containing named server configurations:
{
  "mcpServers": {
    "server1": {
      "command": "python",
      "args": ["/path/to/server.py"],
      "env": {
        "API_KEY": "your_api_key"
      },
      "alwaysAllow": ["tool1", "tool2"],
      "disabled": false
    }
  }
}
Example of MCP Server config in Roo Code (STDIO Transport)
Understanding Transport Types
MCP supports three transport types for server communication: STDIO for local servers, Streamable HTTP (recommended for new remote servers), and SSE (for legacy remote servers).
STDIO Transport
Used for local servers running on your machine:
- Communicates via standard input/output streams
- Lower latency (no network overhead)
- Better security (no network exposure)
- Simpler setup (no HTTP server needed)
- Runs as a child process on your machine
For more in-depth information about how STDIO transport works, see STDIO Transport.
STDIO configuration parameters:
command(required): The executable to run (e.g.,node,python,npx, or an absolute path).args(optional): An array of string arguments to pass to the command. You can reference system environment variables using${env:VARIABLE_NAME}syntax.cwd(optional): The working directory from which to launch the server process. If omitted, defaults to the first workspace folder path or the main process's working directory. Useful if the server script relies on relative paths.env(optional): An object containing environment variables to set for the server process.alwaysAllow(optional): An array of tool names from this server to automatically approve.disabled(optional): Set totrueto disable this server configuration.timeout(optional): Per-server timeout override in seconds (1-3600). If not specified, uses the default of 60 seconds.watchPaths(optional): An array of file paths to watch. When any of these files change, the server will automatically restart.disabledTools(optional): An array of tool names to disable from this server. These tools will not be available for use even if the server provides them.
STDIO configuration example:
{
  "mcpServers": {
    "local-server": {
      "command": "node",
      "args": ["server.js"],
      "cwd": "/path/to/project/root", // Optional: Specify working directory
      "env": {
        "API_KEY": "your_api_key"
      },
      "alwaysAllow": ["tool1", "tool2"],
      "disabled": false
    }
  }
}
Using System Environment Variables in Arguments
You can reference system-level environment variables within the args array using the ${env:VARIABLE_NAME} syntax. This allows you to pass sensitive information like API keys or tokens from your system environment without hardcoding them in your configuration:
{
  "mcpServers": {
    "github": {
      "command": "docker",
      "args": [
        "run",
        "-i",
        "--rm",
        "-e",
        "GITHUB_PERSONAL_ACCESS_TOKEN=${env:GITHUB_PERSONAL_ACCESS_TOKEN}",
        "ghcr.io/github/github-mcp-server"
      ],
      "alwaysAllow": [
        "get_pull_request"
      ]
    }
  }
}
In this example, ${env:GITHUB_PERSONAL_ACCESS_TOKEN} will be replaced with the value of the GITHUB_PERSONAL_ACCESS_TOKEN environment variable from your system. This is particularly useful when:
- Working with Docker containers that need environment variables passed through
- Keeping sensitive credentials out of your configuration files
- Using the same configuration across different environments with different credentials
Note: The environment variable must exist in your system environment for this to work. You can set system environment variables through your operating system's settings or shell configuration files (e.g., .bashrc, .zshrc, or Windows Environment Variables).
Streamable HTTP Transport
This is the modern standard for remote servers accessed over HTTP/HTTPS, offering more flexibility and replacing the legacy SSE transport for new implementations.
- Communicates via HTTP POST/GET to a single MCP endpoint
- Optionally uses Server-Sent Events (SSE) for streaming
- Can be hosted on a different machine
- Supports multiple client connections
- Requires network access
- Allows centralized deployment and management
For more in-depth information about how Streamable HTTP transport works, see Streamable HTTP Transport.
Streamable HTTP configuration parameters:
type(required): Must be set to"streamable-http".url(required): The full URL of the remote MCP server's single endpoint (e.g.,https://your-server.com/mcp).headers(optional): An object containing custom HTTP headers to send with requests (e.g., for authentication tokens).alwaysAllow(optional): An array of tool names from this server to automatically approve.disabled(optional): Set totrueto disable this server configuration.timeout(optional): Per-server timeout override in seconds (1-3600). If not specified, uses the default of 60 seconds.disabledTools(optional): An array of tool names to disable from this server. These tools will not be available for use even if the server provides them.
Streamable HTTP configuration example:
{
  "mcpServers": {
    "modern-remote-server": {
      "type": "streamable-http",
      "url": "https://your-modern-server.com/api/mcp-endpoint",
      "headers": {
        "X-API-Key": "your-secure-api-key"
      },
      "alwaysAllow": ["newToolA", "newToolB"],
      "disabled": false
    }
  }
}
SSE Transport (Legacy)
Used for older remote servers accessed over HTTP/HTTPS. For new remote server implementations, Streamable HTTP Transport is recommended.
- Communicates via Server-Sent Events protocol (typically requires separate endpoints for client-to-server and server-to-client communication)
- Can be hosted on a different machine
- Supports multiple client connections
- Requires network access
- Allows centralized deployment and management
For more in-depth information about how legacy SSE transport works, see SSE Transport (Legacy).
SSE (Legacy) configuration parameters:
type(required for URL-based configs): Must be set to"sse"when using aurlfor an SSE server. For stdio configs (those usingcommand),typedefaults to"stdio"and can be omitted. For any URL-based config, omittingtypewill cause an immediate error—Roo Code cannot infer the transport type from aurlalone.url(required): The base URL for the remote MCP server. For legacy SSE, this usually implies separate paths like/events(for SSE stream) and/message(for POST requests) will be derived or expected by the server.headers(optional): An object containing custom HTTP headers to send with requests (e.g., for authentication tokens).alwaysAllow(optional): An array of tool names from this server to automatically approve.disabled(optional): Set totrueto disable this server configuration.timeout(optional): Per-server timeout override in seconds (1-3600). If not specified, uses the default of 60 seconds.disabledTools(optional): An array of tool names to disable from this server. These tools will not be available for use even if the server provides them.
SSE (Legacy) configuration example:
{
  "mcpServers": {
    "legacy-remote-server": {
      "type": "sse", // Explicitly define as SSE
      "url": "https://your-legacy-server-url.com/mcp-base", // Base URL
      "headers": {
        "Authorization": "Bearer your-legacy-token"
      },
      "alwaysAllow": ["oldToolX"],
      "disabled": false
    }
  }
}
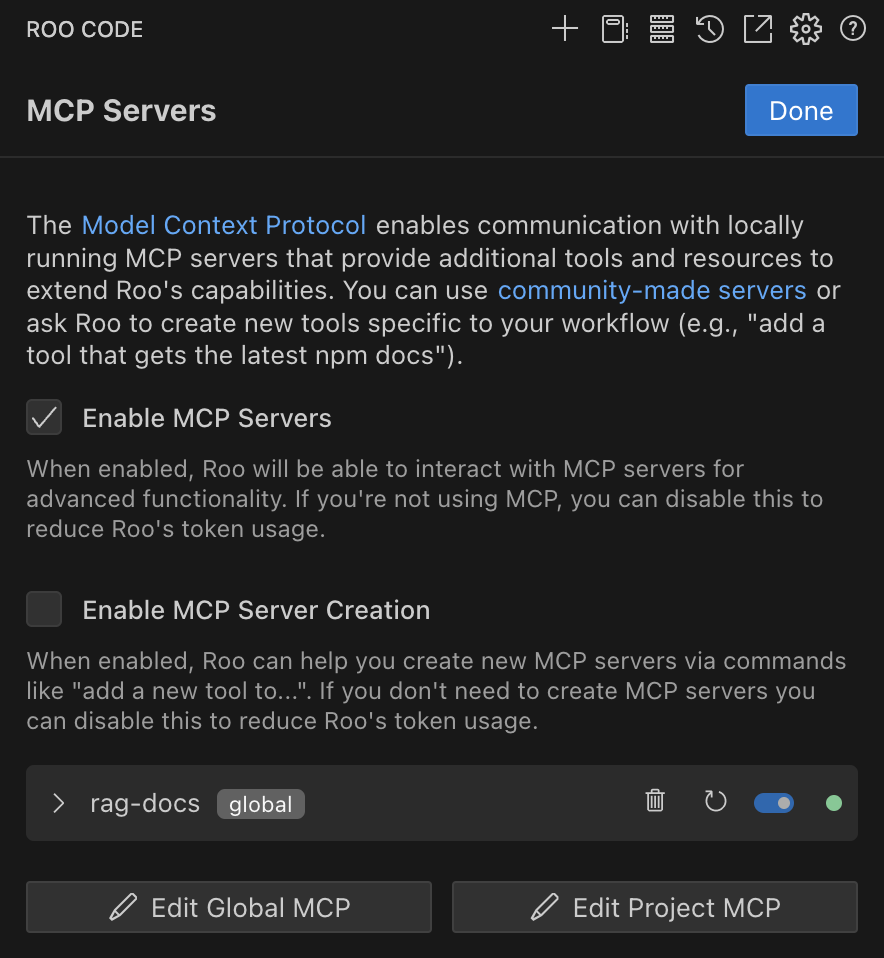
Enabling or Disabling MCP Servers
Disabling your MCP Servers here will remove all MCP related logic and definitions from your system prompt, reducing your token usage. This will prevent Roo Code from connecting to any MCP servers, and the use_mcp_tool and access_mcp_resource tools will not be available. Check this off if you don't intend to use MCP Servers. This is on by default.
- Click the icon in the top navigation of the Roo Code pane
- Check/Uncheck
Enable MCP Servers

Enabling or Disabling MCP Server Creation
Disabling your MCP Server Creation here will just remove the instructions from your system prompt that Roo Code uses to write MCP servers while not removing the context related to operating them. This reduces token usage. This is on by default.
- Click the icon in the top navigation of the Roo Code pane
- Check/Uncheck
Enable MCP Server Creation

How to Use Roo to Create an MCP Server
If you need a specific tool or capability that isn't available through existing MCP servers, you can ask Roo Code to build a new one for you.
Prerequisite: Ensure the Enable MCP Server Creation setting is checked ON in the MCP settings panel. If this is disabled, Roo will not have the necessary instructions to build a server.
How to Initiate:
-
Make a Request: Clearly ask Roo for the new tool or capability. For example:
- "Create an MCP tool that gets the current price of Bitcoin."
- "I need a tool that connects to my company's internal user database via its API."
- "Build an MCP server to interact with the GitHub Gist API."
-
Roo's Process (Simplified): Once you make the request (and the setting is enabled), Roo will:
- Fetch internal instructions for server creation.
- Scaffold a basic server project (usually TypeScript) in the default MCP directory (e.g.,
~/Documents/Cline/MCPon macOS) unless you specify otherwise. - Write the code to implement the requested tool, including handling necessary API calls.
- Handle Secrets: If the tool requires API keys or other credentials, Roo will ask you for them using the
ask_followup_questiontool to ensure they are configured securely as environment variables for the server. - Configure: Automatically add the new server's configuration to your global
mcp_settings.jsonor project.roo/mcp.jsonfile. - Activate: Attempt to connect to the newly configured server so its tools are immediately available.
-
Outcome: If successful, Roo will confirm the creation, and the new server and its tools will appear in your MCP server list, ready for use.
This feature allows you to tailor Roo's capabilities by having it build the specific integrations you need directly from your requests. For a deeper look into the internal mechanics, see the Tool Calling Mechanism.
Managing Individual MCP Servers
Each MCP server has its own configuration panel where you can modify settings, manage tools, and control its operation. To access these settings:
- Click the icon in the top navigation of the Roo Code pane
- Locate the MCP server you want to manage in the list

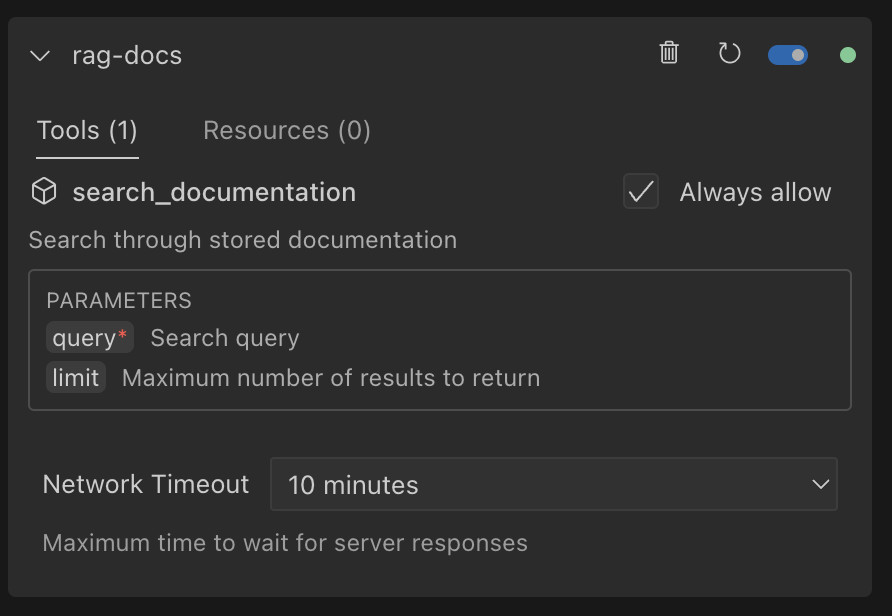
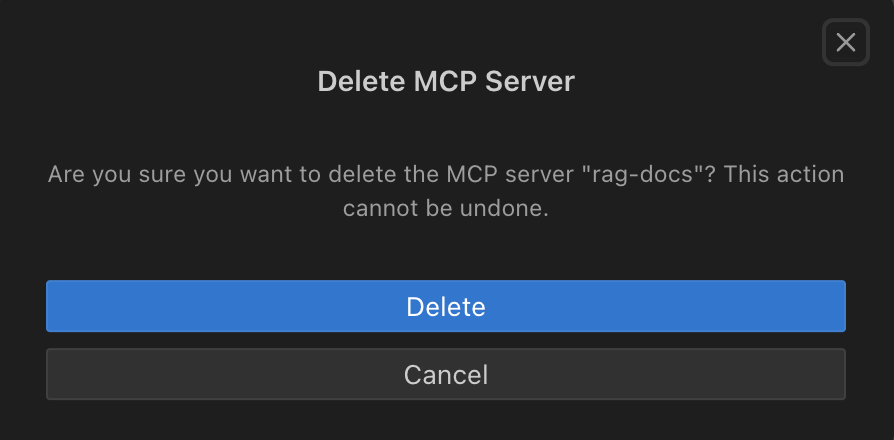
Deleting a Server
- Press the next to the MCP server you would like to delete
- Press the
Deletebutton on the confirmation box
Restarting a Server
- Press the button next to the MCP server you would like to restart
Enabling or Disabling a Server
- Press the toggle switch next to the MCP server to enable/disable it
Network Timeout
To set the maximum time to wait for a response after a tool call to the MCP server:
- Click the
Network Timeoutpulldown at the bottom of the individual MCP server's config box and change the time. Default is 60 seconds (1 minute) but it can be set between 1 second and 3600 seconds (1 hour).

Auto Approve Tools
MCP tool auto-approval works on a per-tool basis and is disabled by default. To configure auto-approval:
- First enable the global "Use MCP servers" auto-approval option in auto-approving-actions
- In the MCP server settings, locate the specific tool you want to auto-approve
- Check the
Always allowcheckbox next to the tool name

When enabled, Roo Code will automatically approve this specific tool without prompting. Note that the global "Use MCP servers" setting takes precedence - if it's disabled, no MCP tools will be auto-approved.
Finding and Installing MCP Servers
Roo Code does not come with any pre-installed MCP servers. You'll need to find and install them separately.
- Community Repositories: Check for community-maintained lists of MCP servers on GitHub
- Ask Roo: You can ask Roo Code to help you find or even create MCP servers (when "Enable MCP Server Creation" is enabled)
- Build Your Own: Create custom MCP servers using the SDK to extend Roo Code with your own tools
For full SDK documentation, visit the MCP GitHub repository.
Using MCP Tools in Your Workflow
After configuring an MCP server, Roo automatically detects its available tools and resources. Effectively leveraging these tools involves understanding the core interaction steps and, crucially, how Roo interprets the tools you provide.
Core Workflow Steps
Your interaction with MCP tools typically follows this sequence:
1. Initiate a Task
Begin by typing your request in the Roo Code chat interface.
2. Tool Identification by Roo
Roo analyzes your request to determine if an available MCP tool can assist. This stage is highly dependent on the quality of your MCP tool definitions.
The Critical Role of Descriptions
Roo's ability to:
- Identify the correct tool for the job,
- Understand how to structure the necessary parameters, and
- Avoid misinterpreting a tool's capabilities, all hinge on clear, concise, and informative descriptions for both the tools themselves and their parameters. Vague or missing information, especially for parameters, can significantly hinder Roo's ability to select or use a tool effectively.
For instance, a request like "Analyze the performance of my API" might lead Roo to consider an MCP tool designed for API endpoint testing. Whether Roo successfully identifies and utilizes this tool as intended is directly influenced by the quality of its description.
Best Practices for Defining MCP Tools
To ensure Roo can leverage your MCP tools efficiently, consider the following when defining them in your server:
- Tool Name: Choose a descriptive and unambiguous name that clearly indicates the tool's primary function.
- Tool Description: Provide a comprehensive summary of what the tool does, its purpose, and any important context or prerequisites for its use. Explain the outcome or result of using the tool.
- Parameter Descriptions: This is critical. For each parameter:
- Clearly state its purpose and what kind of data it expects (e.g., "User ID for lookup," "File path to process," "Search query string").
- Specify any formatting requirements, constraints, or an example of a valid value if applicable.
- Indicate if the parameter is optional or required (though the MCP schema usually handles this, a note can be helpful).
- Clarity for the AI: Write descriptions as if you are explaining the tool to another developer (or an AI). The more context Roo has, the better it can integrate the tool into its problem-solving workflows. If a tool is intended to be used in a specific sequence or in conjunction with other tools, mentioning this can also be beneficial.
- Augment with Custom Instructions: Beyond the descriptions embedded in the MCP server, you can further guide Roo's usage of specific MCP tools by providing Custom Instructions. This allows you to define preferred approaches, outline complex workflows involving multiple tools, or specify when a particular MCP tool should be prioritized or avoided.
3. Tool Invocation
If Roo, guided by the tool descriptions, identifies a suitable tool, it will propose its use. You then approve this (unless auto-approval is configured for trusted tools).
Maximizing Synergy with MCP Servers
By investing effort in crafting detailed descriptions and potentially augmenting them with custom instructions, you significantly improve the synergy between Roo Code and your MCP servers. This unlocks their full potential for more reliable and efficient task completion.
Troubleshooting MCP Servers
Common issues and solutions:
- Server Not Responding: Check if the server process is running and verify network connectivity
- Permission Errors: Ensure proper API keys and credentials are configured in your
mcp_settings.json(for global settings) or.roo/mcp.json(for project settings). - Tool Not Available: Confirm the server is properly implementing the tool and it's not disabled in settings
- Slow Performance: Try adjusting the network timeout value for the specific MCP server
Platform-Specific MCP Configuration Examples
Windows Configuration Example
When setting up MCP servers on Windows, you'll need to use the Windows Command Prompt (cmd) to execute commands. Here's an example of configuring a Puppeteer MCP server on Windows:
{
  "mcpServers": {
    "puppeteer": {
      "command": "cmd",
      "args": [
        "/c",
        "npx",
        "-y",
        "@modelcontextprotocol/server-puppeteer"
      ]
    }
  }
}
This Windows-specific configuration:
- Uses the
cmdcommand to access the Windows Command Prompt - Uses
/cto tell cmd to execute the command and then terminate - Uses
npxto run the package without installing it permanently - The
-yflag automatically answers "yes" to any prompts during installation - Runs the
@modelcontextprotocol/server-puppeteerpackage which provides browser automation capabilities
macOS and Linux Configuration Example
When setting up MCP servers on macOS or Linux, you can use a simpler configuration since you don't need the Windows Command Prompt. Here's an example of configuring a Puppeteer MCP server on macOS or Linux:
{
  "mcpServers": {
    "puppeteer": {
      "command": "npx",
      "args": [
        "-y",
        "@modelcontextprotocol/server-puppeteer"
      ]
    }
  }
}
This configuration:
- Directly uses
npxwithout needing a shell wrapper - Uses the
-yflag to automatically answer "yes" to any prompts during installation - Runs the
@modelcontextprotocol/server-puppeteerpackage which provides browser automation capabilities
The same approach can be used for other MCP servers on Windows, adjusting the package name as needed for different server types.
Runtime Version Manager Configuration
When working with multiple versions of programming languages or runtimes, you may use version managers like asdf or mise (formerly rtx). These tools help manage multiple runtime versions on a single system. Here's how to configure MCP servers to work with these version managers:
mise Configuration Example
mise is a fast, modern runtime version manager that can be used to specify which version of Node.js, Python, or other runtimes to use for your MCP server:
{
  "mcpServers": {
    "mcp-batchit": {
      "command": "mise",
      "args": [
        "x",
        "--",
        "node",
        "/Users/myself/workspace/mcp-batchit/build/index.js"
      ],
      "disabled": false,
      "alwaysAllow": [
        "search",
        "batch_execute"
      ]
    }
  }
}
This configuration:
- Uses the
misecommand to manage runtime versions - The
xsubcommand executes a command with the configured runtime version - The
--separates mise arguments from the command to run - Runs
nodewith the specific version configured in your mise settings - Points to the MCP server JavaScript file
- Automatically allows the "search" and "batch_execute" tools
asdf Configuration Example
asdf is a popular tool for managing multiple runtime versions. Here's how to configure an MCP server to use a specific Node.js version managed by asdf:
{
  "mcpServers": {
    "appsignal": {
      "command": "/Users/myself/.asdf/installs/nodejs/22.2.0/bin/node",
      "args": [
        "/Users/myself/Code/Personal/my-mcp/build/index.js"
      ],
      "env": {
        "ASDF_NODE_VERSION": "22.2.0"
      },
      "disabled": false,
      "alwaysAllow": []
    }
  }
}
This configuration:
- Directly references the Node.js executable from the asdf installations directory
- Sets the
ASDF_NODE_VERSIONenvironment variable to ensure consistent version use - Points to the MCP server JavaScript file
Using version managers ensures that your MCP servers run with the correct runtime version, regardless of the system's default version, providing consistency across different environments and preventing version conflicts.