Customizing Modes
Roo Code allows you to create custom modes to tailor Roo's behavior to specific tasks or workflows. Custom modes can be either global (available across all projects) or project-specific (defined within a single project).
Each mode—including custom ones—features Sticky Models. This means Roo Code automatically remembers and selects the last model you used with a particular mode. This lets you assign different preferred models to different tasks without constant reconfiguration, as Roo switches between models when you change modes.
Looking for ready-to-use custom modes? Visit the Roo Code Marketplace to browse and install community-contributed modes with a single click. The marketplace offers specialized modes for various tasks like React development, documentation writing, testing, and more—all created and shared by the Roo Code community.
Why Use Custom Modes?
- Specialization: Create modes optimized for specific tasks, like "Documentation Writer," "Test Engineer," or "Refactoring Expert."
- Safety: Restrict a mode's access to sensitive files or commands. For example, a "Review Mode" could be limited to read-only operations.
- Experimentation: Safely experiment with different prompts and configurations without affecting other modes.
- Team Collaboration: Share custom modes with your team to standardize workflows.
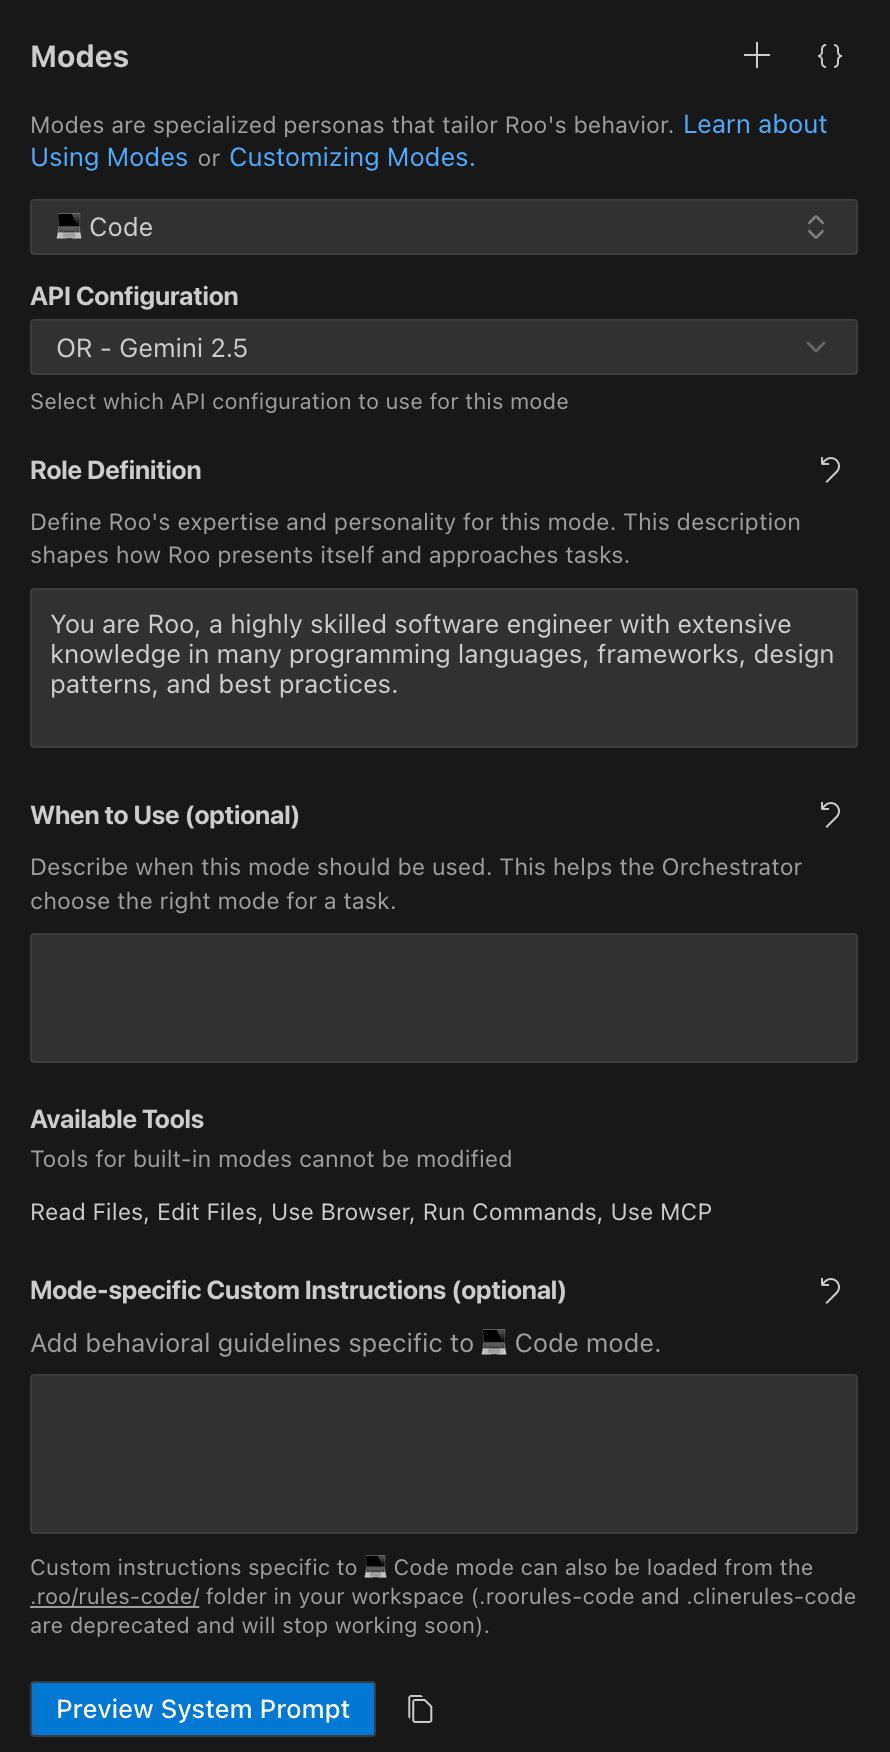
Roo Code's interface for creating and managing custom modes.
What's Included in a Custom Mode?
Custom modes are defined by several key properties. Understanding these concepts will help you tailor Roo's behavior effectively.
| UI Field / YAML Property | Conceptual Description |
|---|---|
Slug (slug) | A unique internal identifier for the mode. It's used by Roo Code to reference the mode, especially for associating mode-specific instruction files. |
Name (name) | The display name for the mode as it appears in the Roo Code user interface. This should be human-readable and descriptive. |
Description (description) | A short, user-friendly summary of the mode's purpose displayed in the mode selector UI. - This text appears below the mode's name in the redesigned mode selector, offering users a quick understanding of the mode's function. - Keep this concise and focused on what the mode does for the user. |
Role Definition (roleDefinition) | Defines the core identity and expertise of the mode. This text is placed at the beginning of the system prompt. - Its primary function is to define Roo's personality and behavior when this mode is active. - With the introduction of the description field, the roleDefinition should provide a detailed description of the mode's identity, while the description field handles the short summary for the UI.- The whenToUse property now takes precedence for summarization in automated contexts like task orchestration. |
Available Tools (groups) | Defines the allowed toolsets and file access permissions for the mode. - In the UI, this corresponds to selecting which general categories of tools (like reading files, editing files, browsing, or executing commands) the mode can use. - The UI shows which files can be edited in the 'Allowed files' section under each mode. - File type restrictions for the "edit" group are typically managed via manual YAML/JSON configuration or by asking Roo to set them up, as detailed in the Property Details for groups. |
When to Use (optional) (whenToUse) | (Optional) Provides guidance for Roo's automated decision-making, particularly for mode selection and task orchestration. - This text is used by Roo, particularly the 🪃 Orchestrator mode, for orchestrating tasks (e.g., via the new_task tool).- It also helps Roo decide which mode is appropriate when switching modes (e.g., via the switch_mode tool).- This field is not displayed in the mode selector UI - that's handled by the description field. |
Custom Instructions (optional) (customInstructions) | Specific behavioral guidelines or rules for the mode. - These instructions are added near the end of the system prompt to further refine Roo's behavior beyond the roleDefinition.- This can be provided directly in the configuration or via separate instruction files. |
Import/Export Modes
Easily share, back up, and template your custom modes. This feature lets you export any mode—and its associated rules—into a single, portable YAML file that you can import into any project.
Key Features
- Shareable Setups: Package a mode and its rules into one file to easily share with your team.
- Easy Backups: Save your custom mode configurations so you never lose them.
- Project Templates: Create standardized mode templates for different types of projects.
- Simple Migration: Move modes between your global settings and specific projects effortlessly.
- Flexible Slug Changes: Change mode slugs in exported files without manual path editing.
Use Case
Before: Manually recreating custom modes and copying .roo/rules-{slug}/ folders for each new project or team member. Changing slugs required manual path updates in the YAML file.
With this feature: A single click exports a mode and all its rules to a YAML file. Another click imports it, setting everything up automatically. You can now change the slug in the exported file and the import process handles all path updates automatically.
How it Works
The import/export functionality is managed from the Modes view.
![]()
Exporting a Mode
- Navigate to the Modes view.
- Select the mode you wish to export.
- Click the Export Mode button (the download icon).
- Choose a location to save the
.yamlfile.
Roo packages the mode's configuration and any rules found in the project's .roo/rules-{slug}/ directory into the YAML file.
Importing a Mode
- Click the Import Mode button (the upload icon) in the Modes view.
- Select the mode's YAML file.
- Choose the import level in the dialog that appears:
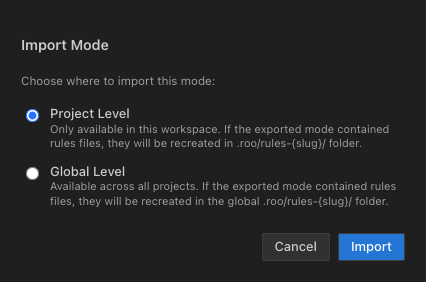
- Project: The mode is available only in the current workspace. It's added to the
.roomodesfile, and its rules are saved to the.roo/rules-{slug}/directory within the project. - Global: The mode is available in all your projects. It's added to your global settings, and its rules are stored in your system's global Roo configuration directory (e.g.,
~/.roo/rules-{slug}/).
- Project: The mode is available only in the current workspace. It's added to the
Note: When exporting modes with rules, all file paths are normalized to use forward slashes for cross-platform compatibility. This ensures modes can be shared between team members using different operating systems.
Exported YAML file format:
customModes:
  - slug: "my-custom-mode"
    name: "My Custom Mode"
    roleDefinition: "You are a helpful assistant."
    groups: ["read", "edit"]
    rulesFiles:
      - relativePath: "rules-my-custom-mode/rules.md"
        content: "These are the rules for my custom mode."
Changing Slugs on Import
When importing modes, you can change the slug in the exported YAML file before importing:
- Export a mode with slug
original-mode - Edit the YAML file and change the slug to
new-mode - Import the file - the import process will:
- Create the new mode with the updated slug
- Update rule file paths to match the new slug
Note: The automatic slug change handling during import ensures that rule file paths are updated correctly when you change the mode slug in the exported file.
FAQ
"What happens if I import a mode that has the same 'slug' as an existing one?"
- The existing mode will be overwritten with the configuration from the imported file.
"What's the main difference between a Global and Project import?"
- Global modes are available across all your VS Code projects. Project modes are specific to the workspace where they are imported and are stored in a
.roomodesfile at the root of your project.
"Can I export built-in modes like Code or Architect?"
- Yes. If you have customized a built-in mode (e.g., by changing its instructions), you can export it to save your customizations.
"What if I import a mode with rules at the Global level?"
- The rules are still preserved. They are stored in a global
rules-{slug}folder in your user home directory (e.g.,~/.roo/rules-my-custom-mode/) instead of the project-specific.roofolder.
"How does the slug change feature work?"
- When you change the slug in an exported YAML file before importing, the import process updates the rule file paths to match the new slug. This ensures the mode works correctly with its new identity.
Methods for Creating and Configuring Custom Modes
You can create and configure custom modes in several ways:
To configure modes, open the Roo Code panel, click the Mode menu under the chatbox, then click the . From there, use "Edit Global Modes" to open settings/custom_modes.yaml, or "Edit Project Modes (.roomodes)" to open your workspace-level configuration.
1. Ask Roo! (Recommended)
You can quickly create a basic custom mode by asking Roo Code to do it for you. For example:
Create a new mode called "Documentation Writer". It should only be able to read files and write Markdown files.
Roo Code will guide you through the process, prompting for necessary information for the properties described in the What's Included in a Custom Mode? table. Roo will create the mode using the preferred YAML format. For fine-tuning or making specific adjustments later, you can use the Modes page or manual configuration.
2. Using the Modes Page
- Open the Modes page: Open the Roo Code panel, click the Mode menu under the chatbox, then click the .
- Create New Mode: Click the button to the right of the Modes heading.
- Fill in Fields:
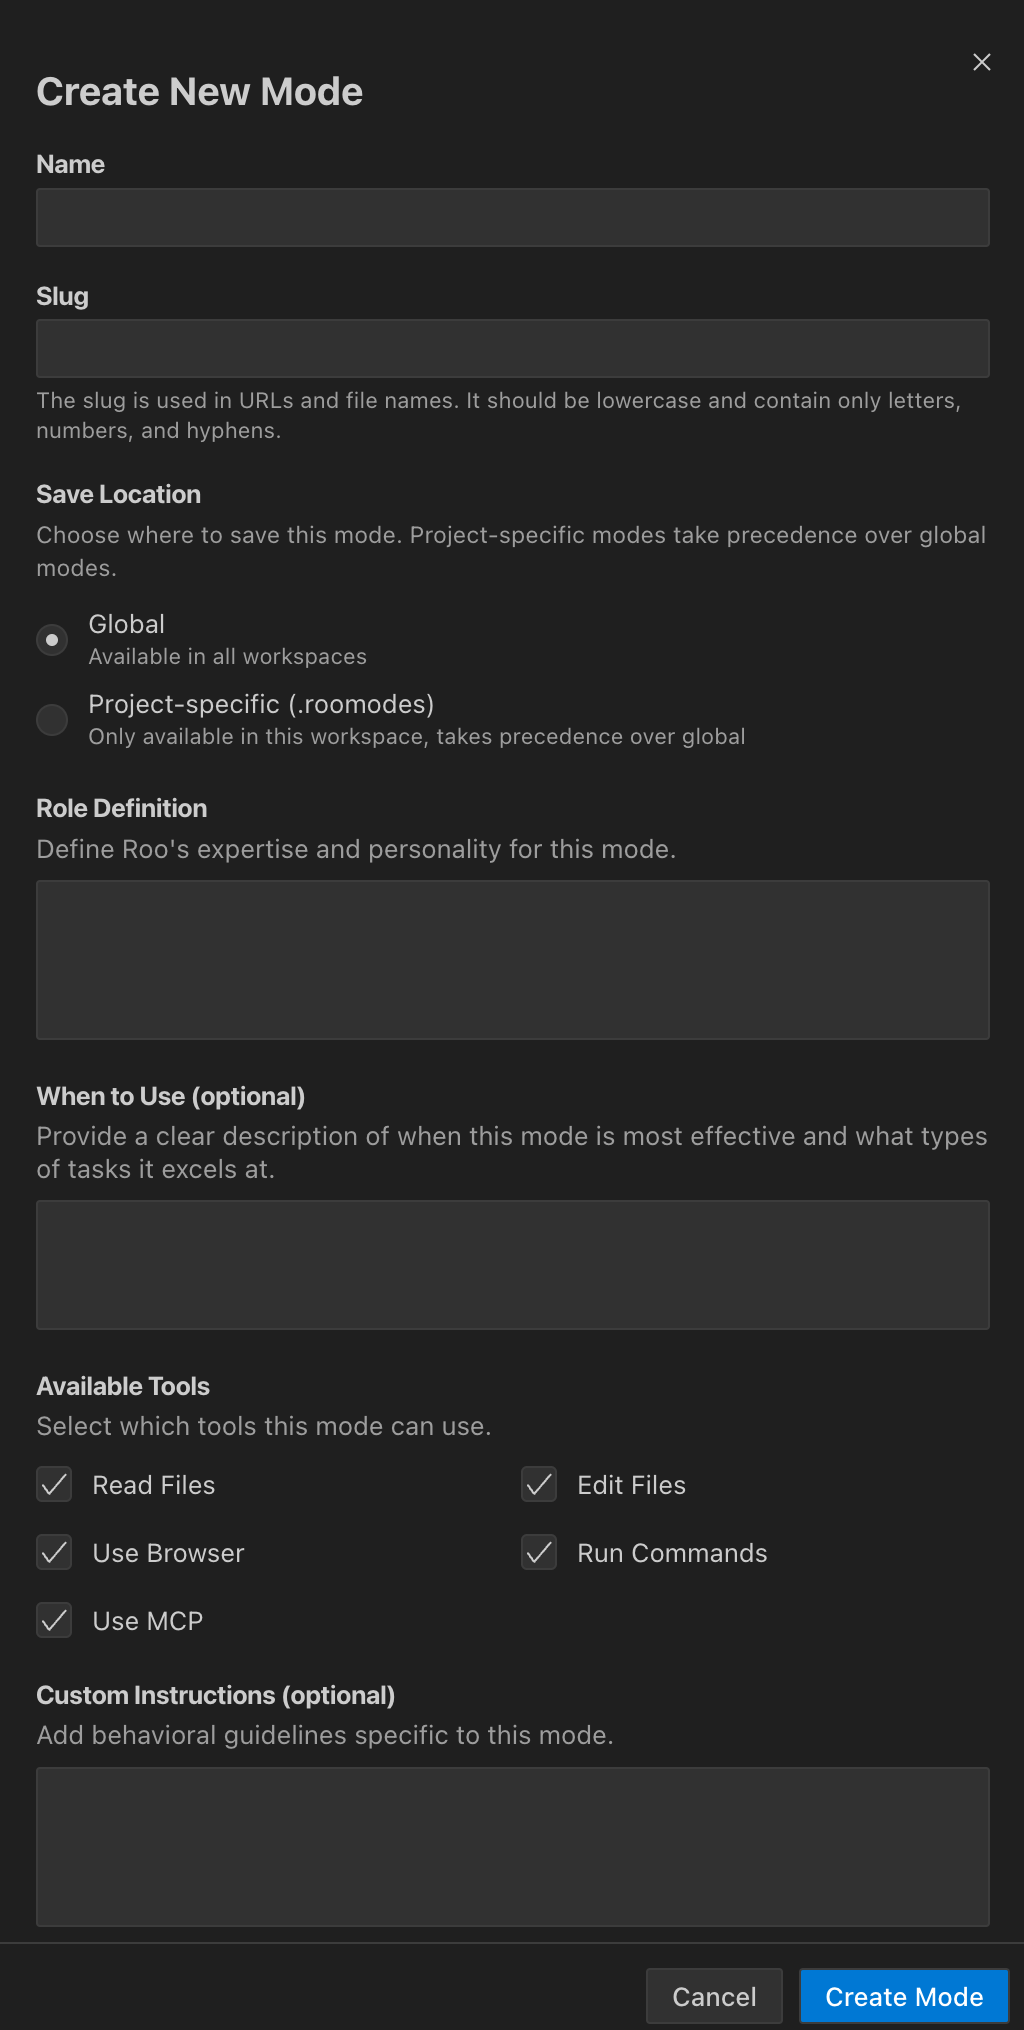
The custom mode creation interface showing fields for name, slug, description, save location, role definition, available tools, custom instructions.
The interface provides fields for Name, Slug, Description, Save Location, Role Definition, When to Use (optional), Available Tools, and Custom Instructions. After filling these, click the "Create Mode" button. Roo Code will save the new mode in YAML format.
Refer to the What's Included in a Custom Mode? table for conceptual explanations of each property. File type restrictions for the "edit" tool group can be added by asking Roo or through manual YAML/JSON configuration.
3. Manual Configuration (YAML & JSON)
You can directly edit the configuration files to create or modify custom modes. This method offers the most control over all properties. Roo Code now supports both YAML (preferred) and JSON formats.
- Global Modes: Edit the
custom_modes.yaml(preferred) orcustom_modes.jsonfile. From the Modes page, click "Edit Global Modes" to opensettings/custom_modes.yaml. - Project Modes: Edit the
.roomodesfile (which can be YAML or JSON) in your project root. From the Modes page, click "Edit Project Modes (.roomodes)" to open or create the workspace file.
These files define an array/list of custom modes.
YAML Example (custom_modes.yaml or .roomodes):
customModes:
  - slug: docs-writer
    name: 📝 Documentation Writer
    description: A specialized mode for writing and editing technical documentation.
    roleDefinition: You are a technical writer specializing in clear documentation.
    whenToUse: Use this mode for writing and editing documentation.
    customInstructions: Focus on clarity and completeness in documentation.
    groups:
      - read
      - - edit  # First element of tuple
        - fileRegex: \.(md|mdx)$  # Second element is the options object
          description: Markdown files only
  - slug: another-mode
    name: Another Mode
    # ... other properties
JSON Alternative (custom_modes.json or .roomodes):
{
  "customModes": [
    {
      "slug": "docs-writer",
      "name": "📝 Documentation Writer",
      "description": "A specialized mode for writing and editing technical documentation.",
      "roleDefinition": "You are a technical writer specializing in clear documentation.",
      "whenToUse": "Use this mode for writing and editing documentation.",
      "customInstructions": "Focus on clarity and completeness in documentation.",
      "groups": [
        "read",
        ["edit", { "fileRegex": "\\.(md|mdx)$", "description": "Markdown files only" }]
      ]
    },
    {
      "slug": "another-mode",
      "name": "Another Mode"
    }
  ]
}
YAML/JSON Property Details
slug
- Purpose: A unique identifier for the mode.
- Format: Must match the pattern
/^[a-zA-Z0-9-]+$/(only letters, numbers, and hyphens). - Usage: Used internally and in file/directory names for mode-specific rules (e.g.,
.roo/rules-{slug}/). - Recommendation: Keep it short and descriptive.
- Note: The
sourceproperty is automatically added by the system and shouldn't be manually set. - YAML Example:
slug: docs-writer - JSON Example:
"slug": "docs-writer"
name
- Purpose: The display name shown in the Roo Code UI.
- Format: Can include spaces and proper capitalization.
- YAML Example:
name: 📝 Documentation Writer - JSON Example:
"name": "Documentation Writer"
description
- Purpose: A short, user-friendly summary displayed below the mode name in the mode selector UI.
- Format: Keep this concise and focused on what the mode does for the user.
- UI Display: This text appears in the redesigned mode selector, offering users a quick understanding of the mode's function.
- YAML Example:
description: A specialized mode for writing and editing technical documentation. - JSON Example:
"description": "A specialized mode for writing and editing technical documentation."
roleDefinition
- Purpose: Detailed description of the mode's role, expertise, and personality.
- Placement: This text is placed at the beginning of the system prompt when the mode is active.
- Updated Role: With the introduction of the
descriptionfield, theroleDefinitionshould provide a detailed description of the mode's identity, while thedescriptionfield handles the short summary for the UI. ThewhenToUseproperty now takes precedence for summarization in automated contexts. - YAML Example (multi-line):
roleDefinition: >-
  You are a test engineer with expertise in:
  - Writing comprehensive test suites
- Test-driven development - JSON Example:
"roleDefinition": "You are a technical writer specializing in clear documentation."
groups
- Purpose: Array/list defining which tool groups the mode can access and any file restrictions.
- Available Tool Groups (Strings):
"read","edit","command","mcp". - Structure: The
groupsproperty uses a specific structure:- Simple string for unrestricted access:
"edit" - Tuple (two-element array) for restricted access:
["edit", { fileRegex: "pattern", description: "optional" }]
- Simple string for unrestricted access:
- File Restrictions for "edit" group:
- To apply file restrictions, the "edit" entry becomes a tuple (YAML list or JSON array) where the first element is
"edit"and the second is a map/object defining the restrictions. fileRegex: A regular expression string to control which files the mode can edit.- In YAML, typically use single backslashes for regex special characters (e.g.,
\.md$). - In JSON, backslashes must be double-escaped (e.g.,
\\.md$).
- In YAML, typically use single backslashes for regex special characters (e.g.,
description: An optional string describing the restriction.- For more complex patterns, see Understanding Regex in Custom Modes.
- To apply file restrictions, the "edit" entry becomes a tuple (YAML list or JSON array) where the first element is
- YAML Example:
groups:
  - read
  - - edit  # First element of tuple
    - fileRegex: \.(js|ts)$  # Second element is the options object
      description: JS/TS files only
- command - JSON Example:
"groups": [
  "read",
  ["edit", { "fileRegex": "\\.(js|ts)$", "description": "JS/TS files only" }],
  "command"
]
whenToUse
- Purpose: (Optional) Provides guidance for Roo's automated decision-making, particularly for mode selection and task orchestration.
- Format: A string describing ideal scenarios or task types for this mode.
- Usage: This field is used by Roo for automated decisions and is not displayed in the mode selector UI - that's handled by the
descriptionfield. If populated, Roo uses this description for orchestration and mode switching; otherwise, the first sentence ofroleDefinitionis used. - YAML Example:
whenToUse: This mode is best for refactoring Python code. - JSON Example:
"whenToUse": "This mode is best for refactoring Python code."
customInstructions
- Purpose: A string containing additional behavioral guidelines for the mode.
- Placement: This text is added near the end of the system prompt.
- Supplementing: Can be supplemented by Mode-Specific Instructions via Files/Directories.
- YAML Example (multi-line):
customInstructions: |-
  When writing tests:
  - Use describe/it blocks
- Include meaningful descriptions - JSON Example:
"customInstructions": "Focus on explaining concepts and providing examples."
Benefits of YAML Format
YAML is now the preferred format for defining custom modes due to several advantages over JSON:
- Readability: YAML's indentation-based structure is often easier for humans to read and understand complex configurations.
- Comments: YAML allows for comments (lines starting with
#), making it possible to annotate your mode definitions.customModes:
- slug: security-review
name: 🔒 Security Reviewer
# This mode is restricted to read-only access
roleDefinition: You are a security specialist reviewing code for vulnerabilities.
whenToUse: Use for security reviews and vulnerability assessments.
# Only allow reading files, no editing permissions
groups:
- read - Multi-line Strings: YAML provides cleaner syntax for multi-line strings (e.g., for
roleDefinitionorcustomInstructions) using|(literal block) or>(folded block).customModes:
- slug: test-engineer
name: 🧪 Test Engineer
roleDefinition: >-
You are a test engineer with expertise in:
- Writing comprehensive test suites
- Test-driven development
- Integration testing
- Performance testing
customInstructions: |-
When writing tests:
- Use describe/it blocks
- Include meaningful descriptions
- Test edge cases
- Ensure proper coverage
# ... other properties - Less Punctuation: YAML generally requires less punctuation (like commas and braces) compared to JSON, reducing syntax errors.
- Editor Support: Most modern code editors provide excellent syntax highlighting and validation for YAML files, further enhancing readability and reducing errors.
While JSON is still fully supported and won't be deprecated, new modes created via the UI or by asking Roo will default to YAML. Both .roomodes files and global configuration files can be either YAML or JSON format.
Tips for Working with YAML
When editing YAML manually, keep these points in mind:
- Indentation is Key: YAML uses indentation (spaces, not tabs) to define structure. Incorrect indentation is the most common source of errors. Ensure consistent spacing for nested elements.
- Colons for Key-Value Pairs: Keys must be followed by a colon and a space (e.g.,
slug: my-mode). - Hyphens for List Items: List items start with a hyphen and a space (e.g.,
- read). - Validate Your YAML: If you encounter issues, use an online YAML validator or your editor's built-in validation to check for syntax errors.
Migration to YAML Format
-
Global Modes: The automatic migration from
custom_modes.jsontocustom_modes.yamlhappens only for global modes when Roo Code starts up, under these conditions:- Roo Code starts up.
- A
custom_modes.jsonfile exists. - No
custom_modes.yamlfile exists yet. The migration process reads the existing JSON file, converts it to YAML format, creates a newcustom_modes.yamlfile, and preserves the original JSON file (e.g., by renaming it) for rollback purposes. Ifcustom_modes.yamlalready exists, it will be used, and no automatic migration ofcustom_modes.jsonwill occur.
-
Project Modes (
.roomodes):- No automatic startup migration: Unlike global modes, project-specific
.roomodesfiles are not automatically converted from JSON to YAML when Roo Code starts. Manual conversion is required for existing JSON.roomodesfiles. - Format Detection: Roo Code can read
.roomodesfiles in either YAML or JSON format. Roo Code automatically detects the format of.roomodesfiles by attempting to parse them as YAML first. - Conversion on UI Edit: If you edit a project-specific mode through the Roo Code UI (e.g., via the Modes page), and the existing
.roomodesfile is in JSON format, Roo Code will save the changes in YAML format. This effectively converts the file to YAML. The original JSON content will be overwritten with YAML. - Manual Conversion: If you want to convert an existing
.roomodesJSON file to YAML without making UI edits, you'll need to do this manually. You can:- Open your existing JSON
.roomodesfile. - Convert its content to YAML (you can ask Roo to help with this, or use an online converter).
- Replace the content of your
.roomodesfile with the new YAML content, or rename the old file (e.g.,.roomodes.json.bak) and save the new content into a file named.roomodes. Ensure the resulting YAML is valid.
- Open your existing JSON
- No automatic startup migration: Unlike global modes, project-specific
For manual conversions of .roomodes files, you can use online JSON to YAML converters or ask Roo to help reformat a specific mode configuration from JSON to YAML. Always validate your YAML before saving.
Mode-Specific Instructions via Files/Directories
You can provide instructions for custom modes using dedicated files or directories within your workspace. This allows for better organization and version control compared to only using the customInstructions property.
Preferred Method: Directory (.roo/rules-{mode-slug}/)
.
├── .roo/
│   └── rules-docs-writer/  # Example for mode slug "docs-writer"
│       ├── 01-style-guide.md
│       └── 02-formatting.txt
└── ... (other project files)
Fallback Method: Single File (.roorules-{mode-slug})
.
├── .roorules-docs-writer  # Example for mode slug "docs-writer"
└── ... (other project files)
Legacy Fallback: .clinerules-{mode-slug}
For backward compatibility, the system also checks for .clinerules-{mode-slug} files as an additional fallback, though this is not recommended for new projects.
The directory method takes precedence if it exists and contains files.
Rules Directory Scope:
- Global modes: Rules are stored in
~/.roo/rules-{slug}/(note the trailing slash) - Project modes: Rules are stored in
{workspace}/.roo/rules-{slug}/(note the trailing slash)
In addition to the customInstructions property, you can provide mode-specific instructions via files in your workspace. This is particularly useful for:
- Organizing lengthy or complex instructions into multiple, manageable files.
- Managing instructions easily with version control.
- Allowing non-technical team members to modify instructions without editing YAML/JSON.
There are two ways Roo Code loads these instructions, with a clear preference for the newer directory-based method:
1. Preferred Method: Directory-Based Instructions (.roo/rules-{mode-slug}/)
- Structure: Create a directory named
.roo/rules-{mode-slug}/in your workspace root. Replace{mode-slug}with your mode's slug (e.g.,.roo/rules-docs-writer/). - Content: Place one or more files (e.g.,
.md,.txt) containing your instructions inside this directory. You can organize instructions further using subdirectories. Files within the.roo/rules-{mode-slug}/directory are read recursively and appended in alphabetical order based on filename (case-insensitive). - Loading: All instruction files found within this directory structure will be loaded and applied to the specified mode. System files (
.DS_Store,.swp, etc.) and cache files are automatically excluded. - Advanced Features: The system supports symbolic links with cycle detection for advanced file organization.
2. Fallback (Backward Compatibility): File-Based Instructions (.roorules-{mode-slug})
- Structure: If the
.roo/rules-{mode-slug}/directory does not exist or is empty, Roo Code will look for a single file named.roorules-{mode-slug}in your workspace root (e.g.,.roorules-docs-writer). - Loading: If found, the content of this single file will be loaded as instructions for the mode.
Precedence:
- The directory-based method (
.roo/rules-{mode-slug}/) takes precedence. If this directory exists and contains files, any corresponding root-level.roorules-{mode-slug}file will be ignored for that mode. - This ensures that projects migrated to the new directory structure behave predictably, while older projects using the single-file method remain compatible.
Combining with customInstructions:
- Instructions loaded from either the directory or the fallback file are combined with the
customInstructionsproperty defined in the mode's configuration. - Typically, the content from the files/directories is appended after the content from the
customInstructionsproperty.
Configuration Precedence
Mode configurations are applied in this order:
- Project-level mode configurations (from
.roomodes- YAML or JSON) - Global mode configurations (from
custom_modes.yaml, thencustom_modes.jsonif YAML not found) - Default mode configurations
Important: When modes with the same slug exist in both .roomodes and global settings, the .roomodes version completely overrides the global one. This applies to ALL properties, not just some. For instance, if you have a global 'code' mode and a project-specific 'code' mode in .roomodes, the project version will be used when working in that project, and all properties from the global version are ignored.
You can override any default mode by including a mode with the same slug in your global or project-specific configuration.
- Note on Instruction Files: Within the loading of mode-specific instructions from the filesystem, the directory
.roo/rules-{mode-slug}/takes precedence over the single file.roorules-{mode-slug}found in the workspace root.
Overriding Default Modes
You can override Roo Code's built-in modes (like 💻 Code, 🪲 Debug, ❓ Ask, 🏗️ Architect, 🪃 Orchestrator) with customized versions. This is done by creating a custom mode with the same slug as a default mode (e.g., code, debug).
Overriding Modes Globally
To customize a default mode across all your projects:
- Open the Modes page: Open the Roo Code panel, click the Mode menu under the chatbox, then click the .
- Edit Global Modes: Click "Edit Global Modes" to open
settings/custom_modes.yaml(orcustom_modes.json). - Add Your Override:
YAML Example:
customModes:
  - slug: code # Matches the default 'code' mode slug
    name: 💻 Code (Global Override) # Custom display name
    roleDefinition: You are a software engineer with global-specific constraints.
    whenToUse: This globally overridden code mode is for JS/TS tasks.
    customInstructions: Focus on project-specific JS/TS development.
    groups:
      - read
      - - edit
        - fileRegex: \.(js|ts)$
          description: JS/TS files only
JSON Alternative:
{
  "customModes": [{
    "slug": "code",
    "name": "💻 Code (Global Override)",
    "roleDefinition": "You are a software engineer with global-specific constraints",
    "whenToUse": "This globally overridden code mode is for JS/TS tasks.",
    "customInstructions": "Focus on project-specific JS/TS development",
    "groups": [
      "read",
      ["edit", { "fileRegex": "\\.(js|ts)$", "description": "JS/TS files only" }]
    ]
  }]
}
This example replaces the default 💻 Code mode with a version restricted to JavaScript and TypeScript files.
Project-Specific Mode Override
To override a default mode for just one project:
- Open the Modes page: Open the Roo Code panel, click the Mode menu under the chatbox, then click the .
- Edit Project Modes (.roomodes): Click "Edit Project Modes (.roomodes)" to open or create the workspace file.
- Add Your Override:
YAML Example:
customModes:
  - slug: code # Matches the default 'code' mode slug
    name: 💻 Code (Project-Specific) # Custom display name
    roleDefinition: You are a software engineer with project-specific constraints for this project.
    whenToUse: This project-specific code mode is for Python tasks within this project.
    customInstructions: Adhere to PEP8 and use type hints.
    groups:
      - read
      - - edit
        - fileRegex: \.py$
          description: Python files only
      - command
JSON Alternative:
{
  "customModes": [{
    "slug": "code",
    "name": "💻 Code (Project-Specific)",
    "roleDefinition": "You are a software engineer with project-specific constraints for this project.",
    "whenToUse": "This project-specific code mode is for Python tasks within this project.",
    "customInstructions": "Adhere to PEP8 and use type hints.",
    "groups": [
      "read",
      ["edit", { "fileRegex": "\\.py$", "description": "Python files only" }],
      "command"
    ]
  }]
}
Project-specific overrides take precedence over global overrides.
Common Use Cases for Overriding Default Modes
- Restricting file access: Limit a mode to specific file types.
- Specializing behavior: Customize expertise for your tech stack.
- Adding custom instructions: Integrate project standards.
- Changing available tools: Remove tools to prevent unwanted operations.
When overriding default modes, test carefully. Consider backing up configurations before major changes.
Understanding Regex in Custom Modes
Regular expressions (fileRegex) offer fine-grained control over file editing permissions.
Let Roo Build Your Regex Patterns
Instead of writing complex regex manually, ask Roo:
Create a regex pattern that matches JavaScript files but excludes test files
Roo will generate the pattern. Remember to adapt it for YAML (usually single backslashes) or JSON (double backslashes).
When you specify fileRegex, you're creating a pattern that file paths must match.
Important Rules for fileRegex:
- Escaping in JSON: In JSON strings, backslashes (
\) must be double-escaped (e.g.,\\.md$). - Escaping in YAML: In unquoted or single-quoted YAML strings, a single backslash is usually sufficient for regex special characters (e.g.,
\.md$). However, YAML regex patterns in quoted strings may need double escaping similar to JSON. - Path Matching: Patterns match against the full relative file path from your workspace root (e.g.,
src/components/button.js). - Case Sensitivity: Regex patterns are case-sensitive by default.
- Validation: Invalid regex patterns are rejected with an "Invalid regular expression pattern" error message.
Common Pattern Examples: In the table below, the 'Pattern (Conceptual / YAML-like)' column shows patterns as they would appear in YAML. For JSON, remember to double-escape backslashes.
| Pattern (Conceptual / YAML-like) | JSON fileRegex Value | Matches | Doesn't Match |
|---|---|---|---|
\.md$ | "\\.md$" | readme.md, docs/guide.md | script.js, readme.md.bak |
^src/.* | "^src/.*" | src/app.js, src/components/button.tsx | lib/utils.js, test/src/mock.js |
| `.(css | scss)$` | "\.(css | scss)$" |
docs/.*\.md$ | "docs/.*\\.md$" | docs/guide.md, docs/api/reference.md | guide.md, src/docs/notes.md |
^(?!.*(test|spec))\.(js|ts)$ | "^(?!.*(test|spec))\\.(js|ts)$" | app.js, utils.ts | app.test.js, utils.spec.js, app.jsx |
Key Regex Building Blocks:
\.: Matches a literal dot. (YAML:\., JSON:\\.)$: Matches the end of the string.^: Matches the beginning of the string..*: Matches any character (except newline) zero or more times.(a|b): Matches either "a" or "b". (e.g.,\.(js|ts)$)(?!...): Negative lookahead.
Testing Your Patterns:
- Test on sample file paths. Online regex testers are helpful.
- Remember the escaping rules for JSON vs. YAML.
- Start simple and build complexity.
When a mode attempts to edit a file that doesn't match its fileRegex pattern, you'll see a FileRestrictionError that includes:
- The mode name
- The allowed file pattern
- The description (if provided)
- The attempted file path
- The tool that was blocked
This information helps you understand why your operation was blocked and what file types are allowed for the current mode.
Additional Features
Built-in Mode Customization
When exporting built-in modes (like Code, Architect, Ask, Debug), any customizations you've made are included in the export. This allows you to share your personalized versions of built-in modes with others.
Mode Deletion and Rules
When deleting a mode through the UI, Roo Code will prompt you about deleting the associated rules folder, showing the exact path before deletion. This helps prevent accidental loss of custom instructions.
Global Rules Directory
In addition to mode-specific rules directories, there's also a generic .roo/rules/ directory (without mode suffix) that can be used for shared rules across all modes.
Troubleshooting
Common Issues:
- Mode not appearing: After creating or importing a mode, you may need to reload the VS Code window for it to appear in the mode selector.
- Invalid regex patterns: If your
fileRegexpattern is invalid, you'll receive an error message. Test your patterns using online regex testers before applying them. - Precedence confusion: Remember that project modes completely override global modes with the same slug - no properties are merged.