Slash Commands
Create custom slash commands to automate repetitive tasks and extend Roo Code's functionality with simple markdown files.
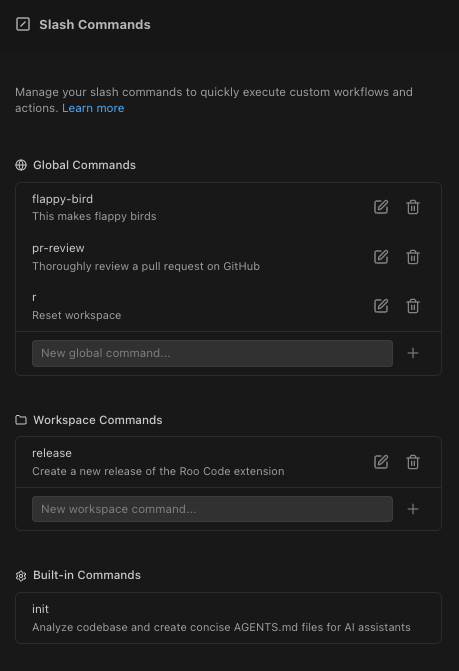
Type / in chat to select a command. To create or manage commands, open Settings > Slash Commands. You can still store commands in .roo/commands/ (project) or ~/.roo/commands/ (global).
Overview
Slash commands let you create reusable prompts and workflows that can be triggered instantly. Turn complex multi-step processes into single commands, standardize team practices, and automate repetitive tasks with simple markdown files.

Key Benefits:
- Workflow Automation: Turn complex multi-step processes into single commands
- Team Standardization: Share commands across your team for consistent practices
- Context Preservation: Include project-specific context in every command
- Quick Access: Fuzzy search and autocomplete for instant command discovery
Creating Custom Commands
Custom commands extend Roo Code's functionality by adding markdown files to specific directories:
- Project-specific:
.roo/commands/in your workspace root - Global:
~/.roo/commands/in your home directory
The filename becomes the command name. For example:
review.md→/reviewtest-api.md→/test-apideploy-check.md→/deploy-check
When creating commands in Settings > Slash Commands, command names are automatically processed:
- Converted to lowercase
- Spaces replaced with dashes
- Special characters removed (except dashes)
- Multiple consecutive dashes replaced with single dash
- Leading/trailing dashes removed
Example: "My Cool Command!" becomes my-cool-command
Basic Command Format
Create a simple command by adding a markdown file:
# review.md
Please review this code for:
- Performance issues
- Security vulnerabilities
- Code style violations
- Potential bugs
Advanced Command with Frontmatter
Add metadata using frontmatter for enhanced functionality:
---
description: Comprehensive code review focusing on security and performance
argument-hint: <file or directory to review>
---

# Security-First Code Review

Please perform a thorough security review of the selected code:

1. **Authentication & Authorization**
   - Check for proper access controls
   - Verify token validation
   - Review permission checks

2. **Input Validation**
   - Identify potential injection points
   - Check for proper sanitization
   - Review data type validation

3. **Security Best Practices**
   - Look for hardcoded secrets
   - Check for secure communication
   - Review error handling for information leakage
Frontmatter Fields:
description: Appears in the command menu to help users understand the command's purposeargument-hint: (Optional) Provides a hint about expected arguments when using the command. See Argument Hints for detailed informationmode: (Optional) Mode slug to switch to before running the command (e.g.,code,architect). Roo switches to this mode first, then executes the command content in that mode's context
Command Management
Create and maintain commands from Settings.
- Click the gear icon in Roo Code and open Settings
- Go to the Slash Commands tab
- Click "New Command", name it, and choose location (Project or Global)
- The command file opens with starter template content
Using Slash Commands
Type / in the chat to open the selection-only command menu. Use the gear icon to open Settings > Slash Commands for creating and editing commands.
- Selection-only: Pick from existing commands; creation and editing live in Settings
- Autocomplete: Start typing to filter commands (e.g.,
/samshowssample-command-name) - Description Preview: See command descriptions in the menu
- Command Priority: Project commands override global commands with the same name
Argument Hints
Argument hints provide instant help for slash commands, showing you what kind of information to provide when a command expects additional input.
When you type / to bring up the command menu, commands that expect arguments will display a light gray hint next to them. This hint tells you what kind of argument the command is expecting.
For example:
/mode <mode_slug>- The hint<mode_slug>indicates you should provide a mode name likecodeordebug/api-endpoint <endpoint-name> <http-method>- Shows you need both an endpoint name and HTTP method
After selecting the command, it will be inserted into the chat input followed by a space. The hint is not inserted; it is only a visual guide to help you know what to type next. You must then manually type the argument after the command.
Adding Argument Hints to Custom Commands
You can add argument hints to your custom commands using the argument-hint field in the frontmatter:
---
description: Generate a new REST API endpoint with best practices
argument-hint: <endpoint-name> <http-method>
---
This will display as /api-endpoint <endpoint-name> <http-method> in the command menu.
Best Practices for Argument Hints:
- Be Specific: Use descriptive placeholders like
<file-path>instead of generic ones like<arg> - Show Multiple Arguments: If your command needs multiple inputs, show them all:
<source> <destination> - Use Consistent Format: Always wrap placeholders in angle brackets:
<placeholder> - Keep It Concise: Hints should be brief and clear
Common Questions:
- "What if I don't provide the argument?" The command might not work as expected, or it might prompt you for more information. The hint is there to help you get it right the first time.
- "Do all commands have hints?" No, only commands that are designed to take arguments will have hints. Commands that work without additional input won't show hints.
- "Can I use a command without replacing the hint?" The hint text (like
<mode_slug>) needs to be replaced with actual values. Leaving the hint text will likely cause the command to fail or behave unexpectedly.
Examples and Use Cases
Mode-Targeting Commands
Use the mode field to ensure a command runs in a specific mode context:
---
description: Analyze architecture and propose improvements
mode: architect
---

Review the current system architecture and suggest improvements for:
- Scalability bottlenecks
- Component coupling
- Security boundaries
- Data flow optimization
When you run this command, Roo switches to Architect mode first, then processes the command content with Architect's role definition and tool restrictions.
Development Workflows
API Endpoint Generator
---
description: Generate a new REST API endpoint with best practices
argument-hint: <endpoint-name> <http-method>
---

Create a new REST API endpoint with the following specifications:
- Proper error handling
- Input validation
- Authentication middleware
- OpenAPI documentation
- Unit tests
- Integration tests

Follow our project's API conventions and patterns.
Database Migration Helper
---
description: Create a database migration with rollback support
---

Generate a database migration that:
1. Includes both up and down migrations
2. Has proper transaction handling
3. Includes data validation
4. Provides clear migration descriptions
5. Follows our naming conventions

Remember to check for dependent migrations and data integrity.
Code Quality
Performance Analyzer
---
description: Analyze code for performance bottlenecks
---

Analyze the selected code for performance issues:
- Identify O(n²) or worse algorithms
- Find unnecessary database queries
- Detect memory leaks
- Suggest caching opportunities
- Recommend async/await optimizations
- Check for proper resource cleanup
Refactoring Assistant
---
description: Suggest refactoring improvements for cleaner code
---

Review this code and suggest refactoring improvements:
- Extract repeated code into functions
- Improve variable and function names
- Simplify complex conditionals
- Apply SOLID principles
- Reduce coupling between components
- Improve testability
Documentation
README Generator
---
description: Create a comprehensive README for the current project
---

Generate a README.md file that includes:
1. Project title and description
2. Installation instructions
3. Usage examples
4. API documentation
5. Configuration options
6. Contributing guidelines
7. License information

Base it on the current project structure and existing code.
API Documentation
---
description: Generate OpenAPI/Swagger documentation
---

Create OpenAPI 3.0 documentation for the API endpoints in this file:
- Include all HTTP methods
- Document request/response schemas
- Add example requests and responses
- Include authentication requirements
- Document error responses
- Add descriptive summaries
Testing
Test Generator
---
description: Generate comprehensive test suites
---

Create tests for the selected code:
1. Unit tests for all public methods
2. Edge case testing
3. Error handling tests
4. Mock external dependencies
5. Performance benchmarks
6. Integration tests where applicable

Use our project's testing framework and conventions.
Test Coverage Analyzer
---
description: Identify missing test coverage
---

Analyze the current test coverage and:
- Identify untested code paths
- Suggest additional test cases
- Find edge cases not covered
- Recommend integration tests
- Check for proper error testing
Best Practices
Command Naming:
- Use descriptive, action-oriented names
- Keep names concise but clear
- Use hyphens for multi-word commands
- Avoid generic names like
helportest - Note: Names are automatically slugified (lowercase, special characters removed)
- The
.mdextension is automatically added/removed as needed
Command Content:
- Start with a clear directive
- Use structured formats (lists, sections)
- Include specific requirements
- Reference project conventions
- Keep commands focused on a single task
Organization:
- Group related commands in subdirectories
- Use consistent naming patterns
- Document complex commands
- Version control your commands
- Share team commands in the project repository
Built-in Commands
Roo Code includes powerful built-in commands that provide specialized functionality:
The init Command
The /init command is a comprehensive AI assistant setup tool that analyzes your codebase and creates tailored configuration files. This powerful command:
Performs Multi-Phase Analysis:
- Discovery Phase: Scans your project structure and identifies key technologies
- Project Identification: Determines project type, frameworks, and dependencies
- Architecture Mapping: Analyzes code organization and patterns
- Build/Test Detection: Identifies build tools, test frameworks, and scripts
- Code Style Extraction: Captures coding conventions and patterns
Creates AI Assistant Configuration:
- Generates mode-specific
AGENTS.mdfiles in.roo/rules-*directories - Creates detailed rules for different AI assistant modes (Code, Architect, Debug, etc.)
- Produces concise, high-signal documentation following the "non-obvious-only" principle
- Supports multiple AI assistant formats (Claude, Cursor, Copilot)
Manages Project Setup:
- Creates comprehensive todo lists for project initialization
- Identifies security and performance considerations
- Documents project-specific conventions and patterns
- Enforces quality criteria for generated documentation
Usage:
Simply type /init in the chat to analyze your codebase and set up AI assistant configuration files tailored to your project.
The init command is especially useful when starting work on a new project or when you want to establish consistent AI assistant behavior across your team.
Troubleshooting
Commands Not Appearing:
- Check file location: Ensure custom command files are in
.roo/commands/or~/.roo/commands/ - Verify file extension: Custom commands must be
.mdfiles - Reload window: Sometimes VS Code needs to be reloaded to detect new command files
Command Not Found: When a slash command isn't found, the LLM will see an error message indicating where commands should be located. This helps guide you to create the command in the right place.
Command Template Content: New commands created through the UI receive template content to help you get started. This template includes basic structure and examples that you can customize.
Command Conflicts:
- Project commands (
.roo/commands/) override global commands (~/.roo/commands/) with the same name - Built-in commands cannot be overridden
- When creating duplicate names through the UI, numbers are appended (e.g.,
new-command-1,new-command-2)
File System Errors:
- Permission Issues: Ensure you have write permissions to the
.roo/commands/directory - Directory Creation: The system will attempt to create the commands directory if it doesn't exist
- Symbolic Links: Command directories support symbolic links for sharing commands across projects
The slash menu includes mode-switching commands (like /code, /ask) that fundamentally change the AI's operational mode - they don't just inject text but switch the entire AI context. Custom modes you create also appear as slash commands (e.g., a mode with slug reviewer becomes /reviewer). These mode commands cannot be overridden by custom workflow commands. Learn more in Using Modes and Custom Modes.
See Also
- Using Modes - Learn about Roo Code's different operational modes
- Custom Instructions - Set persistent instructions for Roo Code
- Keyboard Shortcuts - Quick access to commands
- Task Management - Manage complex workflows